(VB) DNN 5 module development tutorial - part 7: Creating the installation package

7. June 2010 22:54

To C# version

If you have followed the previous parts of this tutorial, you should now have your module and its controls installed on your local DotNetNuke site. This is a great starting point for creating an install package. When DotNetNuke installs an extension package (which is really just the extension’s files zipped together) it uses the installation manifest. The installation manifest is an XML document with a .dnn file extension in the installation package. Basically it tells DotNetNuke which files to put where and which database scripts to run on install/uninstall.
Lucky for us we have access to a great extension installation manifest generator; namely DotNetNuke itself.

Before we start creating the installation package we should finish an important part of it; the database uninstall script.
Back in part 3 we created the database install script where the table and stored procedures are created. In the uninstall script we should remove these.
Open up the file Uninstall.SqlDataProvider and replace its content with the following:

/** Drop Table **/

ALTER TABLE {databaseOwner}[{objectQualifier}SipidCode_Products] DROP CONSTRAINT [FK_{objectQualifier}SipidCode_Products_Modules]
GO

DROP TABLE {databaseOwner}[{objectQualifier}SipidCode_Products]
GO

/** Drop Stored Procedures **/

DROP PROCEDURE {databaseOwner}[{objectQualifier}SipidCode_GetProducts]
GO

DROP PROCEDURE {databaseOwner}[{objectQualifier}SipidCode_GetProduct]
GO

DROP PROCEDURE {databaseOwner}[{objectQualifier}SipidCode_AddProduct]
GO

DROP PROCEDURE databaseOwner}[{objectQualifier}SipidCode_UpdateProduct]
GO

DROP PROCEDURE databaseOwner}[{objectQualifier}SipidCode_DeleteProduct]
GO

Don’t forget to save the file.
The batch script you just created will be run when the module is uninstalled and drops the Products table and its foreign key constraint. It also drops the stored procedures we created.

At last we are ready to create the actual installation package! Log in as Host on your local DotNetNuke website and go to Host > Module Definitions. Scroll down to the Products item and click the edit icon.
Scroll down to the section Package Settings. Here you can fill in the fields if you like. Only the Friendly Name field is mandatory.
When you are done, click the Create Package link at the bottom.

Create Package link

The Create Package screen is displayed. Just click the Next link.

The Choose Files to include screen is displayed.

Choose files to include

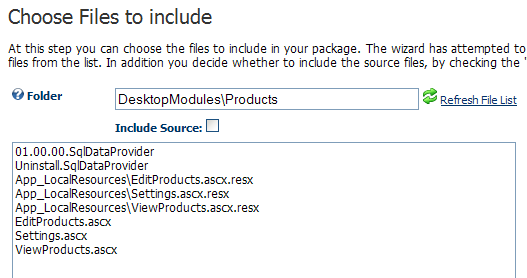
Only the files shown in the picture above should be included in the package:

  • Database install/uninstall scripts
  • Resource files
  • Control markup files

If there are any others, delete those lines from the text box. Click Next when you are done.

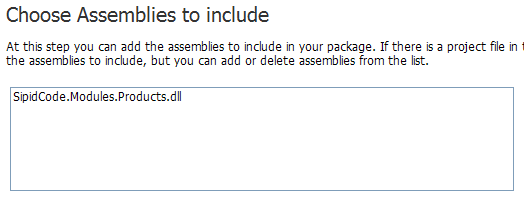
The Choose Assemblies to include screen is displayed. Just click Next.

Assemblies to include

The Create Manifest screen is displayed.

Create Manifest

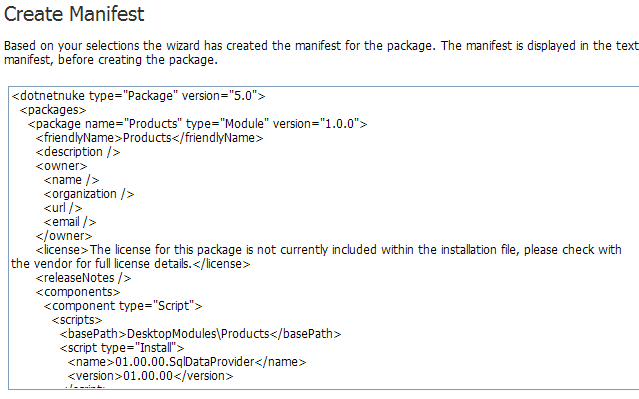
The text box contains the extension installation manifest for the package.
Great to have it generated for you, isn’t it? When you are done admiring the manifest, click next.

The Create Package screen (not the same one as before) is displayed.

Create Package

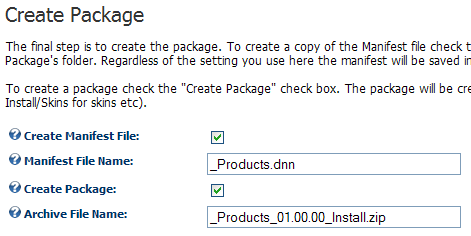
Remove the leading underscore character from the Manifest Field Name. A copy of the manifest file will be written into the project directory, overwriting the old and useless file we got from the template.
Finish by clicking Next.
The installation package is now created and written into the /Install/Module folder of your DotNetNuke installation.
You can now go ahead and install the package where you want. I would recommend you to set up another DotNetNuke site for testing your installations on. If you install it on your development site it will collide with your project files and possibly result in trouble.

Tags: , , ,

DotNetNuke | Modules | Tutorials

Comments

7/29/2010 8:52:22 PM #

Billg

Thanks for all of the good info. If it was not for folks like you, folks like me would never learn anything. What DNN version should I use to follow this tutorial? Install or starter kit? Or does it matter. Thanks again.

Billg United States |

7/31/2010 11:34:37 AM #

Johan

Thanks for the compliments!
Please have a look at part 1 of this tutorial. I think you will find the answer there.

Johan Sweden |

8/11/2010 1:45:40 PM #

javqui

Thanks for the excellent work.
Your tutorial is on the right place at the right time. I follow it step by step and everything works!!. I like your guide a lot.
I will find and send some reward for you, soon.

javqui United States |

8/11/2010 1:57:19 PM #

Johan

Thank you for liking it ;)
Very happy it gave you some guidance.
I love surprises! Curious to see what you come up with Laughing
Happy coding!

Johan Sweden |

9/8/2010 9:32:08 PM #

Mujtaba

I don't seem to find words to offer you for thanks. It was a really great series of articles, the one of a very few elaborate on dnn.
Thank you so much. Smile

Mujtaba

Mujtaba United States |

9/8/2010 10:27:48 PM #

Johan

You are very welcome.
If you are happy, I am happy Smile

Johan Sweden |

9/10/2010 3:12:50 AM #

KrishanG

Thank you for the post this was really helpful.   How does one break into debug mode when trying to debug a module. How is this achieved?.

Krishan

KrishanG Australia |

9/10/2010 3:35:50 PM #

Johan

Hello there!
Please have a look at www.sipidcode.com/.../...g-DotNetNuke-modules.aspx

Hopefully that can get you started.

Johan Sweden |

1/2/2011 5:07:53 AM #

Moses

Very helpful. I was stuck until I found this great tutorial. I'm very grateful to you for taking the time to put together this tutorial and sharing it. Thanks very much for your splendid work. God bless - Moses

Moses United States |

2/10/2011 1:36:13 AM #

krandog

Great Tutorial!  

I have read a few books and other tutorials on how to create a DNN 5 module, and yours by far is the easiest and clearest to follow.  To be honest, I was never able to get the modules that I tried to create following the above mentioned sources to work, and I was left feeling more confused than before I started. I was beginning to feel that the whole process was much more complicated than I thought.

Wrong! I got your module to work on the very first run through of the tutorial.  At first I was a little concerned as I only have Visual Web Developer 2010 Express edition installed on the PC I was using to follow along with. This turned out not to be a problem at all, as everything worked as describe from start to finish.  

I was a little confused on why we were performing some of the steps in the first few pages. However I did have a much better understanding of the project in the following pages.  Just by getting the project to work, your tutorial definitely gave me the confidence I need to start work on my own module.  

In addition you were absolutely right; I am wondering what all the fuss was about.  I can’t say thank you enough!

Steve

krandog United States |

2/10/2011 9:20:30 AM #

Johan

You know those precious moments when you feel really great about something? I just had one of those now when I read your comment. Thanks for the detailed feedback.
Also, thank you for confirming that you can use the express edition for this.
Have a nice day and create a lot of exciting modules!

Johan Sweden |

9/2/2011 11:44:43 AM #

Thomas Kerkmann

Brilliant tutorial, I have learned so much.
Thanks for that.

However, there is one question left over:
The edit module is only reacheable, when the user is allowed to edit the module. This also enables her/him to go to the settings.
What should I do, when I need some user(s) to allow for editing, but not control any settings?
What I did so far is making the editing link of the list only visible, when the user is in a special role, but then when approaching the edit control I get an error message that I'm not allowed to view the edit control.

Any hints ?

Thomas Kerkmann Germany |

Comments are closed

About the addict

Johan Seppäläinen lives in Uppsala, Sweden. He spends most of his days working as a systems architect/developer, specialized in solutions built on Microsoft platforms.
Occasionally there is time for some recreational coding, when he pursues optimal solutions and code zen, mainly in C#. When he is not writing in this blog, that is.