To C# version
During the next parts of this tutorial we will create a module displaying a simple listing of products. We will call it... Products! In this part we will set up the project and look at what is in the templates.
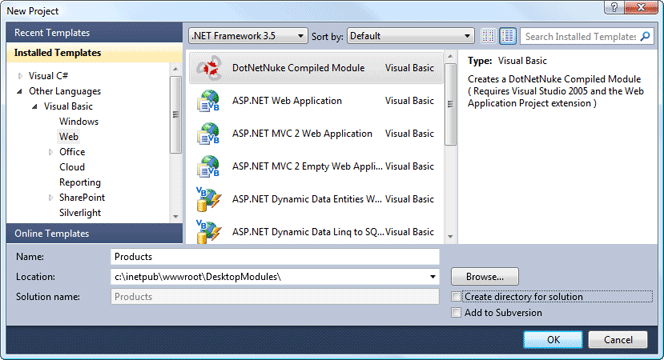
In Visual Studio, create a new project. In the New Project dialog, under Installed Templates, expand Other Languages > Visual Basic and select the Web templates node. Then select "DotNetNuke Compiled Module" from the templates list. Enter "Products" as the name of your module. Then point the location to the "DesktopModules" folder of your DNN installation. Make sure "Create directory for solution" is not checked. This is important. Click OK.
Now when we have the project started, there are a couple of things you should know.
First: the project is kind of a cross-breed between a library project and a web project. This is so we can work with the user controls (the ascx files and their associated code-behind and designer files) pretty much like in a standard web project. If you just start an ordinary library project, add the files needed for a user control and try to work with them in the Visual Studio environment, you are neck deep in additional work.
Second: since the project is of the mixed type described above, it will try to run if you start debugging it. This will not work. I will cover dubugging of modules in some other post.
Third: If a web.config file for some reason is created in your module project; delete it. Since your project folder is a subdirectory in the DotNetNuke web application that hosts you module, a web.config file there will most probably lead to problems later on when you are running your web site.
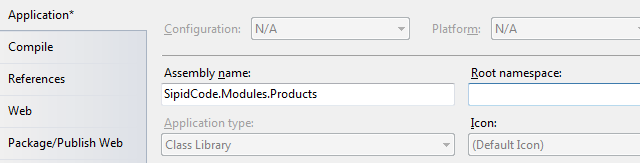
With those things straightened out, go into the properties settings of your project by double-clicking the My Project node in solution explorer. On the Application tab to the left, set the Assembly name to "SipidCode.Modules.Products". Make sure the Root namespace field is empty.
Nowadays DNN is compiled against version 3.5 of the .NET framework. This means we will have to set at least that as target version for our project as well.
Select the Compile tab. Click the Advanced Compile Options... button at the bottom of the screen. At the bottom of the Advanced Compiler Settings dialog, select ".NET Framework 3.5" as Target framework.
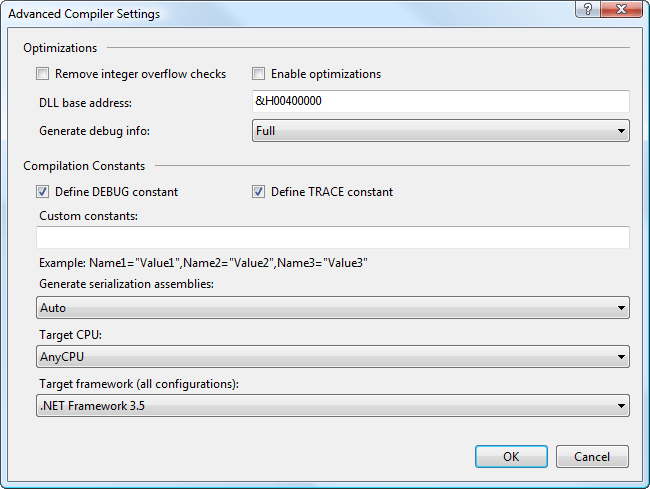
Click OK to close the dialog.
You will now be informed that the project has to be closed and reopened, and asked if you want to continue. Click Yes.
Open up the project properties again. Then select the References tab to the left. As you can see the topmost reference (DotNetNuke.Library) cannot be found. Select it in the list and click the Remove button below the list to remove it.

Now we need a reference to the DotNetNuke assembly for things to work correctly. Click the Add... button below the list. The Add Reference dialog will open. Select the Browse tab. The contents of the Products project folder will be displayed. Go up two levels in the folder structure and from there go into the bin folder. Select the file "DotNetNuke.dll" and click OK.
To make the designer work correctly with DotNetNuke controls we will have to help it find them. Select the
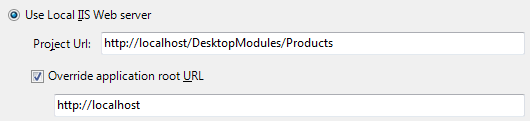
Web tab to the left.
Check the radio button
Use Local IIS Web server. Enter the URL to the folder where your module code is in your local DotNetNuke installation.
Make sure
Override applicationroot URL checkbox is checked and enter the URL to your local DotNetNuke website under it.
You can now close the Products tab.
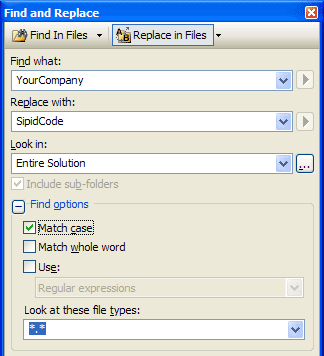
From the Edit menu, select Find and Replace > Replace in Files. Enter "YourCompany" in the Find what field, and "SipidCode" in Replace with. Expand Find options and make sure Look at these file types is set to "*.*". Click Replace All.
You can now compile the project to make sure it works as it should.
Let's take a peek at what the project template has given us.
User controls: ViewProducts, EditProducts and Settings. These correspond to different modes of your module. Their names give us a hint of what they are for. The View control is used when the module is displayed to the visitors of your website. The Edit control is used when an administrator goes into edit mode. This is usually where the content of the module is handled. Then we have the Settings control. That one is displayed in bottom of the settings screen of the control. Used to handle settings special to your module.
Database setup and uninstall scripts: the files with the extension SqlDataProvider. As you see there is one with the version number "01.00.00". That one is run on installation of the module, setting up tables, stored procedures and so on. It's really just a SQL batch script. There can be multiple installation scripts, each corresponding to a version of your module. We will go into the details of that in some future post.
There is also the Uninstall script. That one is run on (yeah! you guessed right!) uninstallation of the module, removing the database objects created by the installation script.
Extension installation manifest: Products.dnn. This is the instruction file for the installation. It tells DotNetNuke stuff like which scripts to run, which files to copy where and so on. We will look closer at that one later on. We've got a lot of other stuff to cover before we get to the installation part.
Components folder. This is where the files involved in the data access layer are located.
The Documentation folder contains only some info concerning the project template. It is pretty obsolete and is of no interest to us.
Next time we are going to take a look into the data layer. Then we will write some code, at last.

 Subscribe