To C# version
This time we are going to create ourselves an edit control. We start with the markup, so open EditProducts.ascx. Make it look like this:
<%@ Control language="vb" Inherits="SipidCode.Modules.Products.EditProducts" AutoEventWireup="false" Explicit="True" Codebehind="EditProducts.ascx.vb" %>
<%@ Register TagPrefix="dnn" TagName="TextEditor" Src="~/controls/TextEditor.ascx"%>
<table width="650" border="0" summary="Edit Product Item">
<tr>
<td width="75">Name</td>
<td><asp:TextBox ID="Name" runat="server"></asp:TextBox></td>
</tr>
<tr>
<td>Description</td>
<td><dnn:TextEditor ID="Description" runat="server" height="200" width="510" /></td>
</tr>
</table>
<p>
<asp:linkbutton cssclass="CommandButton" id="cmdUpdate" resourcekey="cmdUpdate" runat="server" borderstyle="none" text="Update" OnClick="cmdUpdate_Click"></asp:linkbutton>
<asp:linkbutton cssclass="CommandButton" id="cmdCancel" resourcekey="cmdCancel" runat="server" borderstyle="none" text="Cancel" causesvalidation="False" OnClick="cmdCancel_Click"></asp:linkbutton>
<asp:linkbutton cssclass="CommandButton" id="cmdDelete" resourcekey="cmdDelete" runat="server" borderstyle="none" text="Delete" causesvalidation="False" OnClick="cmdDelete_Click"></asp:linkbutton>
</p>
Open EditProducts.ascx.vb. In the region “Private Members” the class variable ItemId is declared. This is where we store the ID of the product item to edit.
Insert the following code into the empty Page_Load method (we deleted the method body in the previous part, remember?):
If Not (Request.QueryString("ItemId") Is Nothing) Then
ItemId = Integer.Parse(Request.QueryString("ItemId"))
End If
Now we have the product item ID in the ItemId variable, if supplied. If there was no ItemId parameter in the query string this means that we should create a new item instead of editing an existing one.
Add the following code:
If Not IsPostBack Then
If Not Null.IsNull(ItemId) Then
cmdDelete.Attributes.Add("onClick", "javascript:return confirm('" + Localization.GetString("DeleteItem") + "');")
Dim dc As New ProductsController
Dim itm As ProductsInfo = dc.GetProduct(ModuleId, ItemId)
If Not itm Is Nothing Then
Name.Text = itm.Name
Description.Text = itm.Description
Else
Response.Redirect(Globals.NavigateURL(), True)
End If
Else
cmdDelete.Visible = False
End If
End If
This only has to be done the first time the page is loaded so we wrap it in a check for IsPostBack. In the case when an ItemId is supplied we add some client script to get a confirmation when deleting an item. Then we fetch the product item with the current module ID and item ID as keys and populate the controls. If there is no matching item, something must be wrong. In that case we redirect the heck out of there, back to the view page.
When an ItemId is not supplied, this means we should create a new item. Just hide the Delete button.
Error handling is always a good thing, so wrap everything in Page_Load in a try-catch. The Page_Load method should now look something like this:
Protected Sub Page_Load(ByVal sender As System.Object, ByVal e As System.EventArgs) Handles MyBase.Load
Try
If Not (Request.QueryString("ItemId") Is Nothing) Then
ItemId = Integer.Parse(Request.QueryString("ItemId"))
End If
If Not IsPostBack Then
If Not Null.IsNull(ItemId) Then
cmdDelete.Attributes.Add("onClick", "javascript:return confirm('" + Localization.GetString("DeleteItem") + "');")
Dim dc As New ProductsController
Dim itm As ProductsInfo = dc.GetProduct(ModuleId, ItemId)
If Not itm Is Nothing Then
Name.Text = itm.Name
Description.Text = itm.Description
Else
Response.Redirect(Globals.NavigateURL(), True)
End If
Else
cmdDelete.Visible = False
End If
End If
Catch ex As Exception
Exceptions.ProcessModuleLoadException(Me, ex)
End Try
End Sub
The error handling code displays an error message to the user, which is enough for us right now.
Go through all three of the Click event handlers and make sure they are marked as Protected and not Private.
Insert the following as method body for cmdCancel_Click:
Response.Redirect(Globals.NavigateURL(), True)
Next in line is the implementation of cmdUpdate_Click. Basically we check if we got an ItemId or not and thereby decide if we should update an existing item or create a new one.
cmdUpdate_Click should look like this:
Protected Sub cmdUpdate_Click(ByVal sender As Object, ByVal e As EventArgs) Handles cmdUpdate.Click
Try
Dim controller As New ProductsController
Dim productItem As New ProductsInfo
productItem.ModuleId = ModuleId
productItem.ItemId = ItemId
productItem.Name = Name.Text
productItem.Description = Description.RichText.Text
If Null.IsNull(ItemId) Then
controller.AddProduct(productItem)
Else
controller.UpdateProduct(productItem)
End If
Response.Redirect(Globals.NavigateURL(), True)
Catch ex As Exception
Exceptions.ProcessModuleLoadException(Me, ex)
End Try
End Sub
One thing to note about the code above is how we pull the content from the Description TextEditor control. If you use Description.Text you will get the HTML encoded content (“<” is converted to “<” and so on) which is not what you want in this case. Use Description.RichText.Text and you will get the raw markup.
The last event handler is cmdDelete_Click. If we have an ItemId then we delete the corresponding product item from the database. Simple as that. cmdDelete_Click should look like this:
Protected Sub cmdDelete_Click(ByVal sender As Object, ByVal e As EventArgs) Handles cmdDelete.Click
Try
If Not Null.IsNull(ItemId) Then
Dim controller As New ProductsController
controller.DeleteProduct(ModuleId, ItemId)
End If
Response.Redirect(Globals.NavigateURL(), True)
Catch ex As Exception
Exceptions.ProcessModuleLoadException(Me, ex)
End Try
End Sub
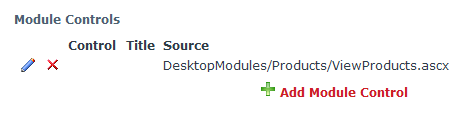
With that done, compile the project to make sure everything is ok. Then log in as host in your DotNetNuke website. Now we’re going to add our brand new edit control to the Products module. Go to Host > Module Definitions. Locate the Products row in the list and click the edit icon.

Scroll down to the section Module Controls and click Add Module Control.
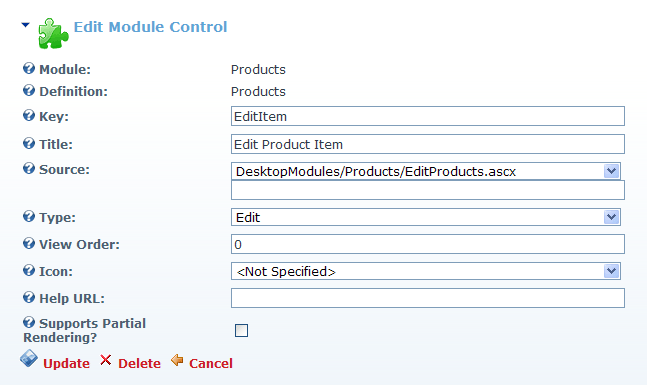
Make the following settings and click Update:
Now we can at last create product items and edit them. Great! Try it out!
Go to the page where you added the Products module. Make sure you are in edit mode. Now click the Add Content link. This time it actually happens something interesting. You should now see the edit control with a text field for product name and a text editor for description. Enter some text in them and click Update. The product you just added should now appear in the product list.
Now click the edit (pencil) icon next to the product name. This will take you to the edit screen and let you edit the product item.
Play around with your nice new controls until next time, when we look at the settings control.

 Subscribe