To C# version
The settings control is used a bit differently from the view and edit controls. On the module settings page the standard settings are always shown. If you create and register a settings control it will be appended to the end of the standard settings and show up at the bottom of the page.
While the edit page is used to edit the content of the module, the settings page handles the behavior of the module.
In our scenario we will create a settings control where you can configure if the product description will be displayed or not. And yes, I know it’s a pretty lame example but at least it doesn’t clutter up what I am trying to show: the basics for creating a settings control.
‘Nuff said, let’s get to work.
Since the configuration of whether to show the product description or not is basically an on/off selection we will use a checkbox control. Open Settings.ascx and make the contents look like this:
<%@ Control Language="vb" AutoEventWireup="false" Inherits="SipidCode.Modules.Products.Settings" Codebehind="Settings.ascx.vb" %>
<%@ Register TagPrefix="dnn" TagName="Label" Src="~/controls/LabelControl.ascx" %>
<table cellspacing="0" cellpadding="2" border="0">
<tr>
<td width="150"><dnn:Label ID="ShowDescriptionLabel" runat="server" ControlName="ShowDescription" Suffix=":"></dnn:Label></td>
<td><asp:CheckBox id="ShowDescription" runat="server" /></td>
</tr>
</table>
Now open Settings.ascx.vb. As you might remember from previous parts the view and edit controls inherit from PortalModuleBase. An important difference with the settings control is that it inherits from ModuleSettingsBase. If you are going to create your controls from scratch, don’t forget this.
ModuleSettingsBase inherits from PortalModuleBase and gives us members necessary for loading and updating settings for the module instance.
As you can see the templates have supplied us with overrides of the ModuleSettingsBase methods LoadSettings and UpdateSettings. Change them so they look like the following:
Public Overrides Sub LoadSettings()
Try
If (Not IsPostBack) Then
If String.IsNullOrEmpty(CType(TabModuleSettings("ShowDescription"), String)) Then
ShowDescription.Checked = True
Else
Dim show As Boolean
If Not Boolean.TryParse(CType(TabModuleSettings("ShowDescription"), String), show) Then
show = True ' Default to showing the description
End If
ShowDescription.Checked = show
End If
End If
Catch ex As Exception
ProcessModuleLoadException(Me, ex)
End Try
End Sub
Public Overrides Sub UpdateSettings()
Try
Dim controller As New Entities.Modules.ModuleController
controller.UpdateTabModuleSetting(TabModuleId, "ShowDescription", ShowDescription.Checked.ToString())
Catch ex As Exception
ProcessModuleLoadException(Me, ex)
End Try
End Sub
No black magic here either. In LoadSettings we get the settings from the settings store and populate our controls (in our scenario we only have one checkbox).
In UpdateSettings we get the settings from the controls and stuff them back into the settings store.
Note that settings are only stored in string form, so you have to convert them to and from strings if they are other types (as our show description setting is a bool).
With the logic in place, let’s look at the resources for this control. Open Settings.ascx.resx in the App_LocalResources folder. Make it look something like this:
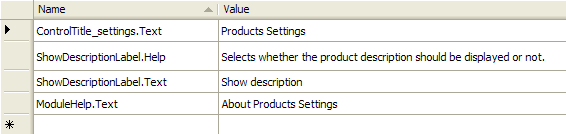
Here is what the different keys are used for:
| ControlTitle_settings.Text: |
This is the section header text for your settings control. |
| ShowDescriptionLabel.Help: |
Tooltip text for the question mark icon by the Show description label. |
| ShowDescriptionLabel.Text: |
Text of the Show description label. |
| ModuleHelp.Text: |
When the Help link is clicked, this text is displayed. |
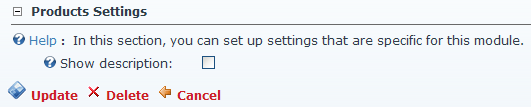
And this is how your settings control will look in a moment:
Just a couple of steps left until you can see it for yourself...
Now compile your project so we can go ahead and register the control.
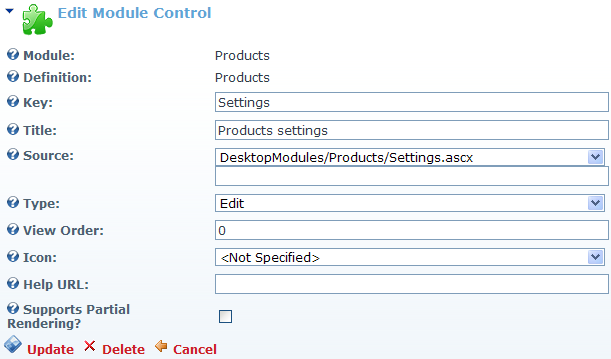
In DotNetNuke, go to Host > Module Definitions. Locate Products in the list and click the edit icon. Scroll down to the Module Controls section and click Add Module Control.
Make the following settings, then click Update:
Now go to the page where you added the Products module and click the settings icon. At the bottom of the settings page you should now see your settings control as the section with the header Product Settings.
If you play around with the Show description setting you will notice that the product list shows the description regardless of what you set. This, of course, is because we have not yet implemented any functionality in the view control that takes this setting into account.
To correct this, open up ViewProducts.ascx.vb. Locate the ProductList_ItemDataBound event handler and make it look like this (the green section of code is added):
Protected Sub ProductList_ItemDataBound(ByVal sender As Object, ByVal e As System.Web.UI.WebControls.ListViewItemEventArgs) Handles ProductList.ItemDataBound
If e.Item.ItemType = ListViewItemType.DataItem Then
Dim prod As ProductsInfo
prod = CType(CType(e.Item, ListViewDataItem).DataItem, ProductsInfo)
If Me.PortalSettings.UserMode = DotNetNuke.Entities.Portals.PortalSettings.Mode.Edit Then
Dim prodContainer As Panel
Dim editLink As New HtmlAnchor
prodContainer = CType(e.Item.FindControl("ProductContainer"), Panel)
editLink.HRef = EditUrl("ItemId", prod.ItemId.ToString(), "EditItem")
editLink.Style.Add("width", "16px")
editLink.Style.Add("height", "16px")
editLink.Style.Add("display", "inline-block")
editLink.Style.Add("background-image", "url(" + DotNetNuke.Common.Globals.ApplicationPath + "/images/edit.gif)")
editLink.Title = "Edit product"
prodContainer.Controls.AddAt(0, editLink)
End If
' Show description according to setting.
Dim productDescription As Label
Dim showDescription As Boolean
productDescription = CType(e.Item.FindControl("ProductDescription"), Label)
If Not Boolean.TryParse(CType(Settings("ShowDescription"), String), showDescription) Then
showDescription = True
End If
productDescription.Visible = showDescription
End If
End Sub
Compile the project again, the go and play with the setting again. The list should now display the description text only if the Show description checkbox is checked.

 Subscribe