To Visual Basic version
A DotNetNuke module usually contains several user controls; view, edit and settings. We will start by creating our view control. As I mentioned in part 2 of this series, the view control is what is displayed to your visitors. The Products view control will be a list of product items belonging to the module instance.
Open ViewProducts.ascx. Delete all content of the file and replace it with this:
<%@ Control Language="C#" Inherits="SipidCode.Modules.Products.ViewProducts" AutoEventWireup="true" CodeBehind="ViewProducts.ascx.cs" %>
<asp:ListView ID="ProductList" runat="server" OnItemDataBound="ProductList_ItemDataBound">
<LayoutTemplate>
<div class="sc-productlist-container">
<asp:PlaceHolder ID="itemPlaceholder" runat="server"></asp:PlaceHolder>
</div>
</LayoutTemplate>
<ItemTemplate>
<asp:Panel ID="ProductContainer" runat="server" CssClass="sc-product-container">
<asp:Label ID="ProductName" runat="server" CssClass="sc-product-name" Text='<%# Eval("Name") %>'></asp:Label>
<asp:Label ID="ProductDescription" runat="server" CssClass="sc-product-description" Text='<%# Eval("Description") %>'></asp:Label>
</asp:Panel>
</ItemTemplate>
</asp:ListView>
You might notice that the ListView tag has a green squiggly under it and that the tooltip tells us that it is not a known element. This is because the project defaults to target .NET 2.0. The ListView control appeared in version 3.5 of the .NET framework, so we need to set that for the project.
Open the project properties by right-clicking it in solution explorer and selecting Properties from the context menu. In the Application tab, select “.NET Framework 3.5” in the Target Framework drop-down. When selected, a messagebox appears telling us that the project has to be closed and reopened. Click “Yes” in the message box.
Once the project is reopened you will notice that you now have a web.config file in there. If you paid any attention at all in part 2, you know you don’t want that. Delete it now.
Open ViewProducts.ascx.cs and replace the Page_Load method with the following:
protected void Page_Load(object sender, System.EventArgs e)
{
try
{
ProductsController controller = new ProductsController();
List<ProductsInfo> products;
// Get the product list.
products = controller.GetProducts(ModuleId);
// Bind the product list to the ListView control.
ProductList.DataSource = products;
ProductList.DataBind();
}
catch (Exception ex)
{
// Module failed to load
Exceptions.ProcessModuleLoadException(this, ex);
}
}
Delete the method lstContent_ItemDataBound.
Add the method ProductList_ItemDataBound, looking like this:
protected void ProductList_ItemDataBound(object sender, ListViewItemEventArgs e)
{
if (e.Item.ItemType == ListViewItemType.DataItem)
{
ProductsInfo prod = (ProductsInfo)((ListViewDataItem)e.Item).DataItem;
if (this.PortalSettings.UserMode == DotNetNuke.Entities.Portals.PortalSettings.Mode.Edit)
{
Panel prodContainer = (Panel)e.Item.FindControl("ProductContainer");
System.Web.UI.HtmlControls.HtmlAnchor editLink = new System.Web.UI.HtmlControls.HtmlAnchor();
editLink.HRef = EditUrl("ItemId", prod.ItemId.ToString(), "EditItem");
editLink.Style.Add("width", "16px");
editLink.Style.Add("height", "16px");
editLink.Style.Add("display", "inline-block");
editLink.Style.Add("background-image", "url(/images/edit.gif)");
editLink.Title = "Edit product";
prodContainer.Controls.AddAt(0, editLink);
}
}
}
In ProductList_ItemDataBound we check if the module is viewed in edit mode. In that case we add a link to the edit page (which we have not created a control for yet). The URL to the edit page is created by calling the EditUrl method (defined in PortalModuleBase).
This particular variant of the method will return an URL with the query string parameter "ItemId" carrying the value of the curent product item. The last method parameter will tell the edit page to show the edit control registered with the key "EditItem". You will learn more about that in the next part.
By adding edit links to the items in the list we have created a way to edit existing items, but how about creating new items then?
The ViewProducts class implements the interface IActionable, which defines the property ModuleActions. Look in the region “Optional Interfaces” for the implementation. The property returns a ModuleActionCollection object containing the actions that can be performed on the module. Each action is represented by an icon (or an entry in the module title flip-out menu) when the module is viewed in edit mode.
You can return several actions for a module, but for now we are content with the “add content” action we got from the template.
We will just make one small adjustment: locate the call to EditUrl() and give it the string "EditItem" as parameter. The property implementation should then look like this:
public ModuleActionCollection ModuleActions
{
get
{
ModuleActionCollection Actions = new ModuleActionCollection();
Actions.Add(GetNextActionID(), Localization.GetString(ModuleActionType.AddContent, this.LocalResourceFile),
ModuleActionType.AddContent, "", "add.gif", EditUrl("EditItem"), false, DotNetNuke.Security.SecurityAccessLevel.Edit,
true, false);
return Actions;
}
}
In Page_Load you might see a squiggly under the references to ProductList.

This is because the designer has not updated itself since we pasted the contents into ViewProducts.ascx. To force an update, open ViewProducts.ascx, make some small change like adding or deleting a space or something and save the file. This usually does the trick.
In part 3 we made a lot of changes in the data layer. Due to this there is a lot of broken code in the EditProducts and Settings controls. To sidestep this we just delete the broken code for now and create working code in coming posts.
In EditProducts.ascx.cs, delete the contents of methods Page_Load, cmdUpdate_Click and cmdDelete_Click. Now we should be able to successfully compile the project again and are ready to try out the view in DotNetNuke.
We are going to set up the module manually in the system so we can run it, so open your browser and point it to your local DotNetNuke installation. Log in with the Host account.
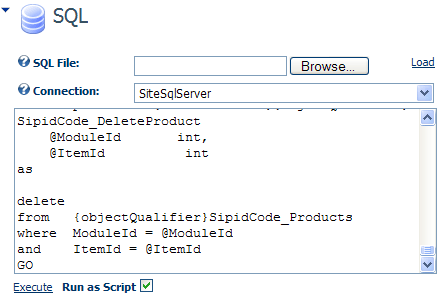
We begin with setting up the database, so select SQL from the Host menu. In Visual Studio, open the file 01.00.00.SqlDataProvider. Copy all text and paste it into DotNetNuke. Make sure Run as Script is checked and click Execute.

From the Host menu, select Module Definitions. Make sure Edit mode is selected.

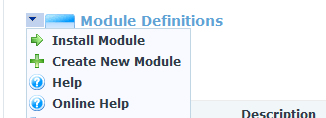
Select Create New Module from the Module Definitions flip-out menu.

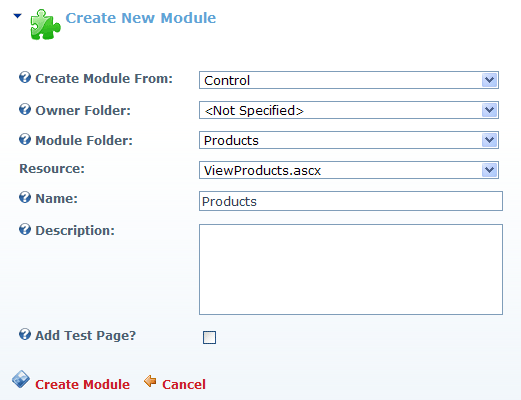
In the Create New Module screen, select/enter the following settings:

Then click Create Module.
You should now be able to add the module Products to a page. Go ahead and try it.
There will of course not be any products in the list, since we have not defined any yet. As you can see there is an Add Content link in the module (corresponding to the module's action we looked at earlier in this post.), but there is no Edit control so it will only lead to a blank page.
In the next post we will create that Edit control so we can put some products into the list.